Authentication and authorization in a microservice architecture: Part 2 - Authentication
application architecture architecting securityContact me for information about consulting and training at your company.
The MEAP for Microservices Patterns 2nd edition is now available
This article is the second in a series of articles about authentication and authorization in a microservice architecture. The complete series is:
-
Overview of authentication and authorization in a microservice architecture
-
Implementing complex authorization using Oso Cloud local authorization
This article explores how to implement authentication in a microservice architecture. Authentication is the mechanism for verifying a user’s identity while authorization controls what the user can do. Section 1 introduces the core concepts, beginning with a brief description of the microservice architecture, the architecture of the RealGuardIO example, and an overview of how to tackle authentication challenges in such an architecture. Section 2 explains how to delegate authentication to a dedicated identity and access management (IAM) service. It provides an overview of the OAuth 2.0 and OpenID Connect protocols, which are used by an IAM service to implement authentication and authorization. Finally, Section 3 demonstrates how these concepts are applied in the RealGuardIO application. It describes each architectural element — React-based UI, BFF, Spring Authorization Server-based IAM service, and backend services — and walks through both the login flow and the end-to-end request flow from the UI to the backend.
Let’s begin with the fundamentals of authentication in a microservice architecture.
An introduction to authentication in a microservice architecture
The microservice architecture is an architectural style that structures the application as a collection of two or more, loosely design-time coupled, independently deployable services. The primary goal of the microservice architecture is to enable the large organizations - consisting of many teams - to develop large, complex applications using fast flow: the continuous delivery of a stream of small changes to end users with a continuous stream of feedback from those users.
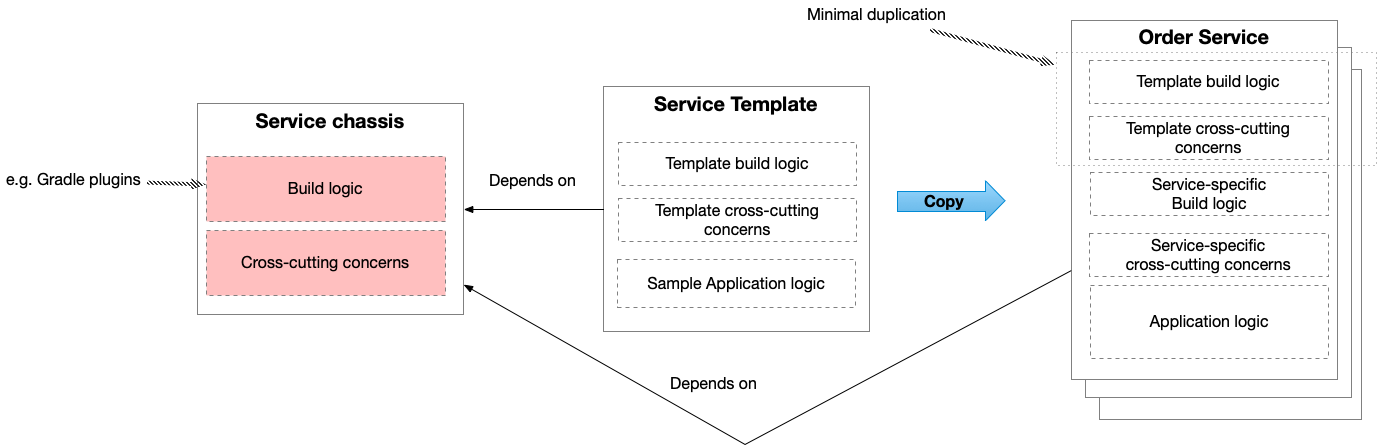
The following diagram shows the architecture of the RealGuardIO application, which I introduced in part 1.
The RealGuardIO application consists of various services including the following:
-
Customer Service- manages customers, employees, employees’ roles and the customer’s locations -
Security System Service- manages security systems -
Notification Service- delivers notifications (SMS, email, mobile notifications, etc.) to users -
…
The application has multiple clients. There are human users who use browser-based UI and mobile applications. There are also 3rd party applications that use the application’s REST API.
The RealGuardIO application must authenticate both API clients and human users. Implementing authentication in a microservice architecture presents two challenges. The first challenge is the decentralized nature of the application. It consists of multiple services, each exposing its own set of REST endpoints. This raises the question: does each service need to implement authentication independently?
The second challenge is that authentication is inherently complex and error-prone. It requires secure password storage, protection against common attacks such as CSRF, and ongoing compliance with evolving security best practices. What’s more, applications must sometimes support multiple login mechanisms, including social login providers, which adds further complexity to the authentication logic.
Let’s now look at how to tackle these challenges. We will begin by exploring the concept of an API Gateway, which acts as a gatekeeper for client requests. As it turns out, an API Gateway is an ideal place to implement authentication, since it sits between the client and the backend services.
The API Gateway: a central location in a decentralized architecture
In a monolithic architecture, communication between a client, such as a React UI, and the application is relatively straightforward.
A client makes requests to one of the monolith’s REST endpoints, such as GET /securitysystems, which query and update business entities.
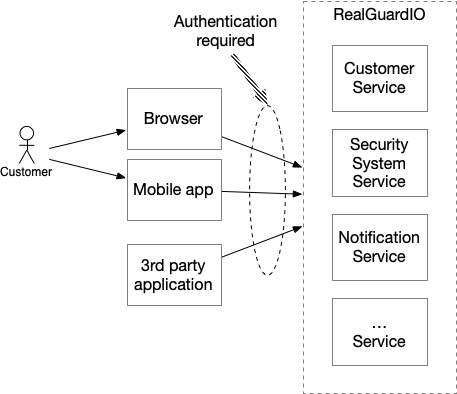
But in a microservice architecture client-application communication is less straightforward because there isn’t a single set of endpoints.
As the following diagram shows, each of the application’s services, such as the Security System Service has its own set of REST endpoints:
In theory, a client could directly call each service, but a better solution is to implement the API Gateway pattern. An API Gateway is a service that acts as a single entry point into the application for all client requests. As the following diagram shows, the UI makes a request to API Gateway, which then forwards the request to the appropriate backend service:

A variation of the API Gateway pattern is the Backend for Frontend (BFF) pattern. A BFF is an API Gateway that supports a single frontend (a.k.a. client), such as a React-based UI. Among other things, it provides an API that’s tailored to the needs of the client. Later on in this article, I describe the RealGuardIO application’s BFF.
The API Gateway has many benefits. For example, it shields the UI from the inevitable changes in the backend service architecture. The API Gateway is also an ideal place to implement cross-cutting concerns, such as authentication. To understand why, let’s first explore the simpler case of authenticating an API client before moving on to the more complex case of login-based authentication.
Authenticating an API Client
Let’s imagine the client is an application that makes requests to the API Gateway.
In order to access a secured endpoint such as GET /securitysystems, the application can require the client to provide credentials.
The credentials, which identify a client, typically consist of an API Key and possibly a secret, that are passed in the request’s Authorization header.
The API Gateway could simply forward the GET /securitysystems request to the Security System Service, which then authenticates the credentials against a database.
The problem with this approach is that every service would need to implement authentication.
There’s also the issue of how each service knows the user’s credentials, since services don’t share databases.
A better option is to make the API Gateway responsible for authenticating each request before forwarding it to the appropriate service. This frees the individual services from needing to handle authentication themselves. Later in Delegating authentication to an identity and access management service, I describe that while the API Gateway is responsible for authenticating each incoming request, it does not perform the authentication itself. Instead, it delegates authentication to a separate service that validates the credentials.
Propagating user identity to the services
Centralizing authentication in the API gateway simplifies the services.
This, however, creates a new problem: if they no longer authenticate the credentials, how do they know the identity of the user?
For example, the Security System Service may need to know which user made the request in order to enforce permissions or record audit information.
The solution is for the API Gateway to propagate the user identity to the Security System Service by including it in a request’s header.
The Security System Service can then use the user identity to, for example, retrieve the user’s security systems from the database or record who changed the state of a security system.
As I describe below, a common way to convey user identity is by passing a JSON Web Token (JWT).
A JWT is a signed JSON document containing claims about the user, including their identity and permissions.
The API gateway can pass the JWT in a request header (usually the Authorization header), allowing backend services to securely identify the user and enforce authorization - without performing authentication themselves.
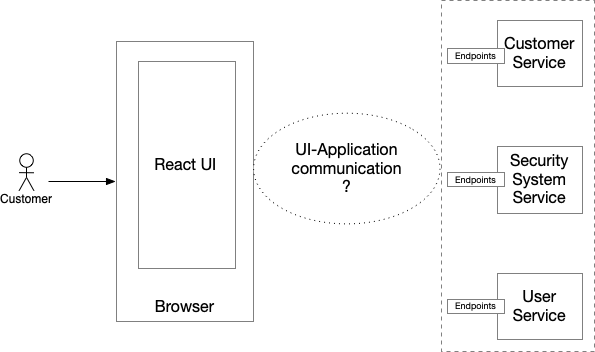
The following diagram shows the flow.
The API Gateway authenticates the API client’s credentials and passes a JWT containing the user’s information to the Security System Service.
Login-based authentication requires session state
The API Gateway authenticates every request from an API Client. If, however, the client is a UI, authentication only happens once - when the user logs into the application. The application typically displays a login page; the user enters their credentials, which are then authenticated by the application. After that, subsequent requests from the UI to the API Gateway must somehow be associated with the client.
The solution is for the login mechanism to create a session that is associated with the user’s identity. The API Gateway returns a session token - typically as a cookie - to the UI. The UI includes this session token in every subsequent request. The API Gateway then maps the session token to the user’s information, which is then propagated to the backend services as before.
The following diagram shows the flow for each type of client:
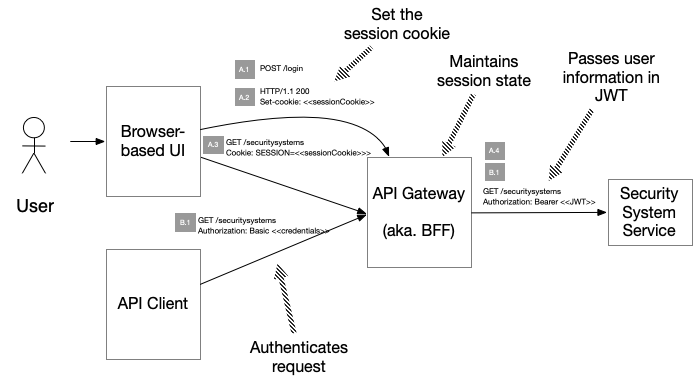
There are two common ways to implement sessions. The first option is for the session token to act as a session identifier, which the API Gateway uses to retrieve the session state from a database. The second option is for the session token to contain the session state itself. It could, for example, be an encrypted JWT. Each approach has trade-offs in terms of performance, scalability, and revocation capabilities. The example application described below uses the second option.
Delegating authentication to an identity and access management service
The API Gateway/BFF could implement authentication itself. For an API client, it could authenticate the client’s credentials by verifying that they match what’s stored in a user database and then generating a JWT. Similarly, for a UI, the API Gateway/BFF would display the login page and then authenticate the submitted credentials. On the surface, this seems quite straightforward. However, implementing authentication securely is complex and error-prone. It requires secure password storage, protection against common attacks, such as CSRF, and compliance with evolving security best practices. Moreover, applications often need to support multiple login mechanisms, including social logins.
For these reasons, many teams choose to delegate authentication to an identity and access management (IAM) service, which may either run on your infrastructure or be offered as a SaaS solution.
These products typically implement login using a combination of two standards: OAuth 2.0, which is an authorization protocol, and OpenID Connect (OIDC), which is an authentication protocol built on OAuth 2.0.
As you will see, once a user has been authenticated, an OAuth 2/OIDC-based IAM service issues a JWT-based access token that contains the user’s identity and permissions.
The API Gateway/BFF stores the access token in the session and includes it in requests forwarded to the backend services.
Let’s take a closer look at how these protocols work — starting with OAuth 2.0.
About OAuth 2.0
OAuth was originally developed to enable a user of a service to allow a 3rd party service to access their data without disclosing their password. For example, OAuth 2.0 enables a Gmail user to securely grant Zoom access to their calendar. The outcome of the authorization process, which is officially known as a flow, is an access token being issued to the 3rd party application. The 3rd party application - e.g., Zoom - includes that token in the request to the service’s API - e.g., Gmail - which uses the token to authorize the request. Let’s look at how tokens are issued.
The high-level view of an authorization flow
An authorization flow involves the following four parties:
-
Resource Owner - user that wants to grant the Client access to their data
-
Client - 3rd party application, such as Zoom
-
Resource server - the API that the user wants the Client to access, such as the Google calendar API
-
Authorization Server - authenticates users and issues access tokens, which the client presents to the resource server
The following diagram shows at a high level how these four parties collaborate to grant access:

Without getting into the details, the flow for issuing an access token for a browser-based UI works something like this:
-
To obtain access to the resource server, the client redirects the user’s browser to the Authorization Server’s authorization endpoint
-
If the user is not already logged into the Authorization Server, the user enters their credentials, and the Authorization Server validates them
-
The user confirms that the Authorization Server should grant the Client access
-
The authorization server redirects the browser to the client’s redirection endpoint
-
The client’s redirection endpoint’s handler invokes the authorization server’s token endpoint to obtain an access token, which grants access to the resource server
The authorization flow for a browser-based UI is, out of necessity, one of the more complex flows. OAuth 2.0 defines several other authorization flows, which are used in different scenarios. An API Gateway can, for example, obtain an access token for an API client by simply making a request to the authorization server’s token endpoint, which returns an access token.
Once the client application has obtained an access token, it includes the token in the HTTP request to the resource server (step 6 in the diagram). The resource server validates the token and uses it to authorize the request (step 7 in the diagram). Later on, I’ll describe the flow in more detail.
About access tokens
There are two types of access tokens: opaque and transparent. An opaque token is a random sequence of characters. In order to authorize a request containing an opaque token, the resource server must invoke the authorization server to decode the token. A transparent token contains information in a format that the resource server can decode. It eliminates the overhead of a roundtrip to the authorization server.
Modern OAuth 2.0 authorization servers typically issue transparent access tokens in the form of JSON web tokens (JWTs). A JWT is a signed JSON document containing a set of claims - key-value pairs containing information about the user and the token itself. A client’s permissions are represented as claims within the JWT. JWTs are typically signed using an asymmetric algorithm, which uses a private key only known to the authorization server. To validate a JWT, a resource server can - on startup - retrieve the corresponding public key from the authorization server using its JWKS endpoint, which I describe below.
One drawback of JWT-based access tokens is that anyone who possesses one can access the resource server. Unlike with opaque tokens, the resource server does not contact the authorization server to validate a JWT; it verifies the token locally. Authorization servers typically issue JWT access tokens with a short expiration time to limit the impact of token theft. To avoid forcing the resource owner to repeatedly authenticate, the authorization server also issues a long-lived refresh token, which the client can use to obtain new access tokens as needed. The client should store the refresh token securely, as it grants ongoing access. A client can revoke a refresh token by making a request to the authorization server’s token revocation endpoint.
Strictly speaking, even though OAuth 2.0 often involves authenticating the user, it is not an authentication mechanism. Specifically, the intended recipient of the access token is the resource server. It does not provide the client with information about the user. Implementing authentication with OAuth 2.0 requires the use of OpenID Connect.
About OpenID connect
OpenID Connect (OIDC) is an authentication layer on top of OAuth 2.0. It introduces the concept of an ID token, which the authorization server issues along with an access token. An ID token is a JWT that has claims conveying identity information about the authenticated user. To confuse matters, however, modern authorization servers often include a user’s identity information in the access token as well.
In addition to defining an ID token, OIDC defines three endpoints:
-
user infoendpoint - returns information about a user -
discoveryendpoint - returns a JSON document detailing the server’s endpoints -
JWKSendpoints - returns the public key user to validate JWT signatures
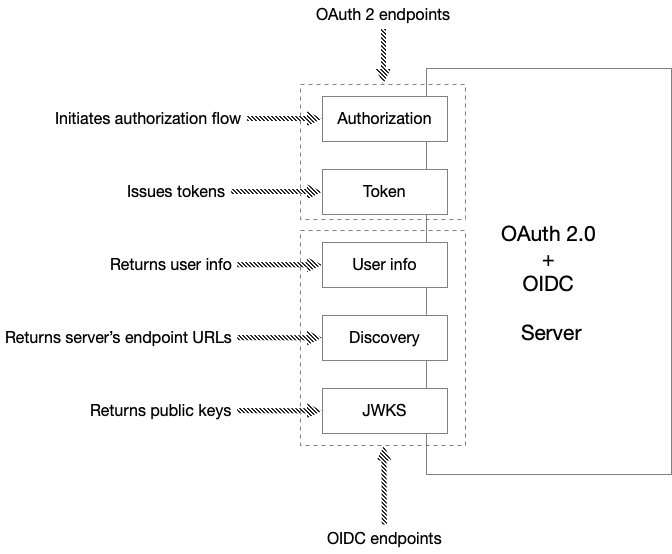
Let’s look at each OIDC endpoint in turn.
User info endpoint
A client invokes the user info endpoint to obtain information about a user.
On the surface, this might seem redundant since the client is given an ID token.
However, depending on the implementation, the ID token might only contain a subset of the user’s information - perhaps due to size limits.
Furthermore, the ID token (and the access token) contains a static snapshot of the user information.
In contrast, the user info endpoint returns the complete, and up-to-date information about the user.
Discovery endpoint
OpenID Connect also defines a discovery endpoint, which returns a JSON document containing metadata about the server. Most notably, it contains the URLs of the server’s endpoints that are used in the authentication flow.
JWKS endpoint
Another other endpoint defined by OIDC is the JWKS (JSON Web Key Set) endpoint. It returns a JSON document containing the public keys needed to verify the digital signatures of access token and ID token JWTs. For example, on startup, a resource server will retrieve the public keys from the JWKS endpoint so that it can authorize client requests.
Deploying an IAM service
There are two options for deploying an IAM service. One option is to host your own IAM service. There are various open-source services to choose from, including Spring Authorization Server and Keycloak. The other option is to use a cloud-based SaaS solution, such as Okta, AWS Cognito, or Google Identity Platform.
Implementing authentication in the RealGuardIO application using OAuth 2.0 and OIDC
Together, OAuth 2.0 and OpenID connect provide an authentication and authorization mechanism that works well in a microservice architecture. The BFF plays the role of the OAuth 2.0 client, and the backend services are resource servers. One notable difference from the traditional OAuth 2.0 scenario is that the client, resource server, and authorization server are all (effectively) part of the same application.
Let’s look at how authentication is implemented in RealGuardIO using OAuth 2.0 and OpenID Connect. First, I’ll describe the individual architectural elements. After that, I’ll walk through how they collaborate to implement authentication.
Overview of the RealGuardIO authentication architecture
The following diagram is an overview of how authentication is implemented in the RealGuardIO application:
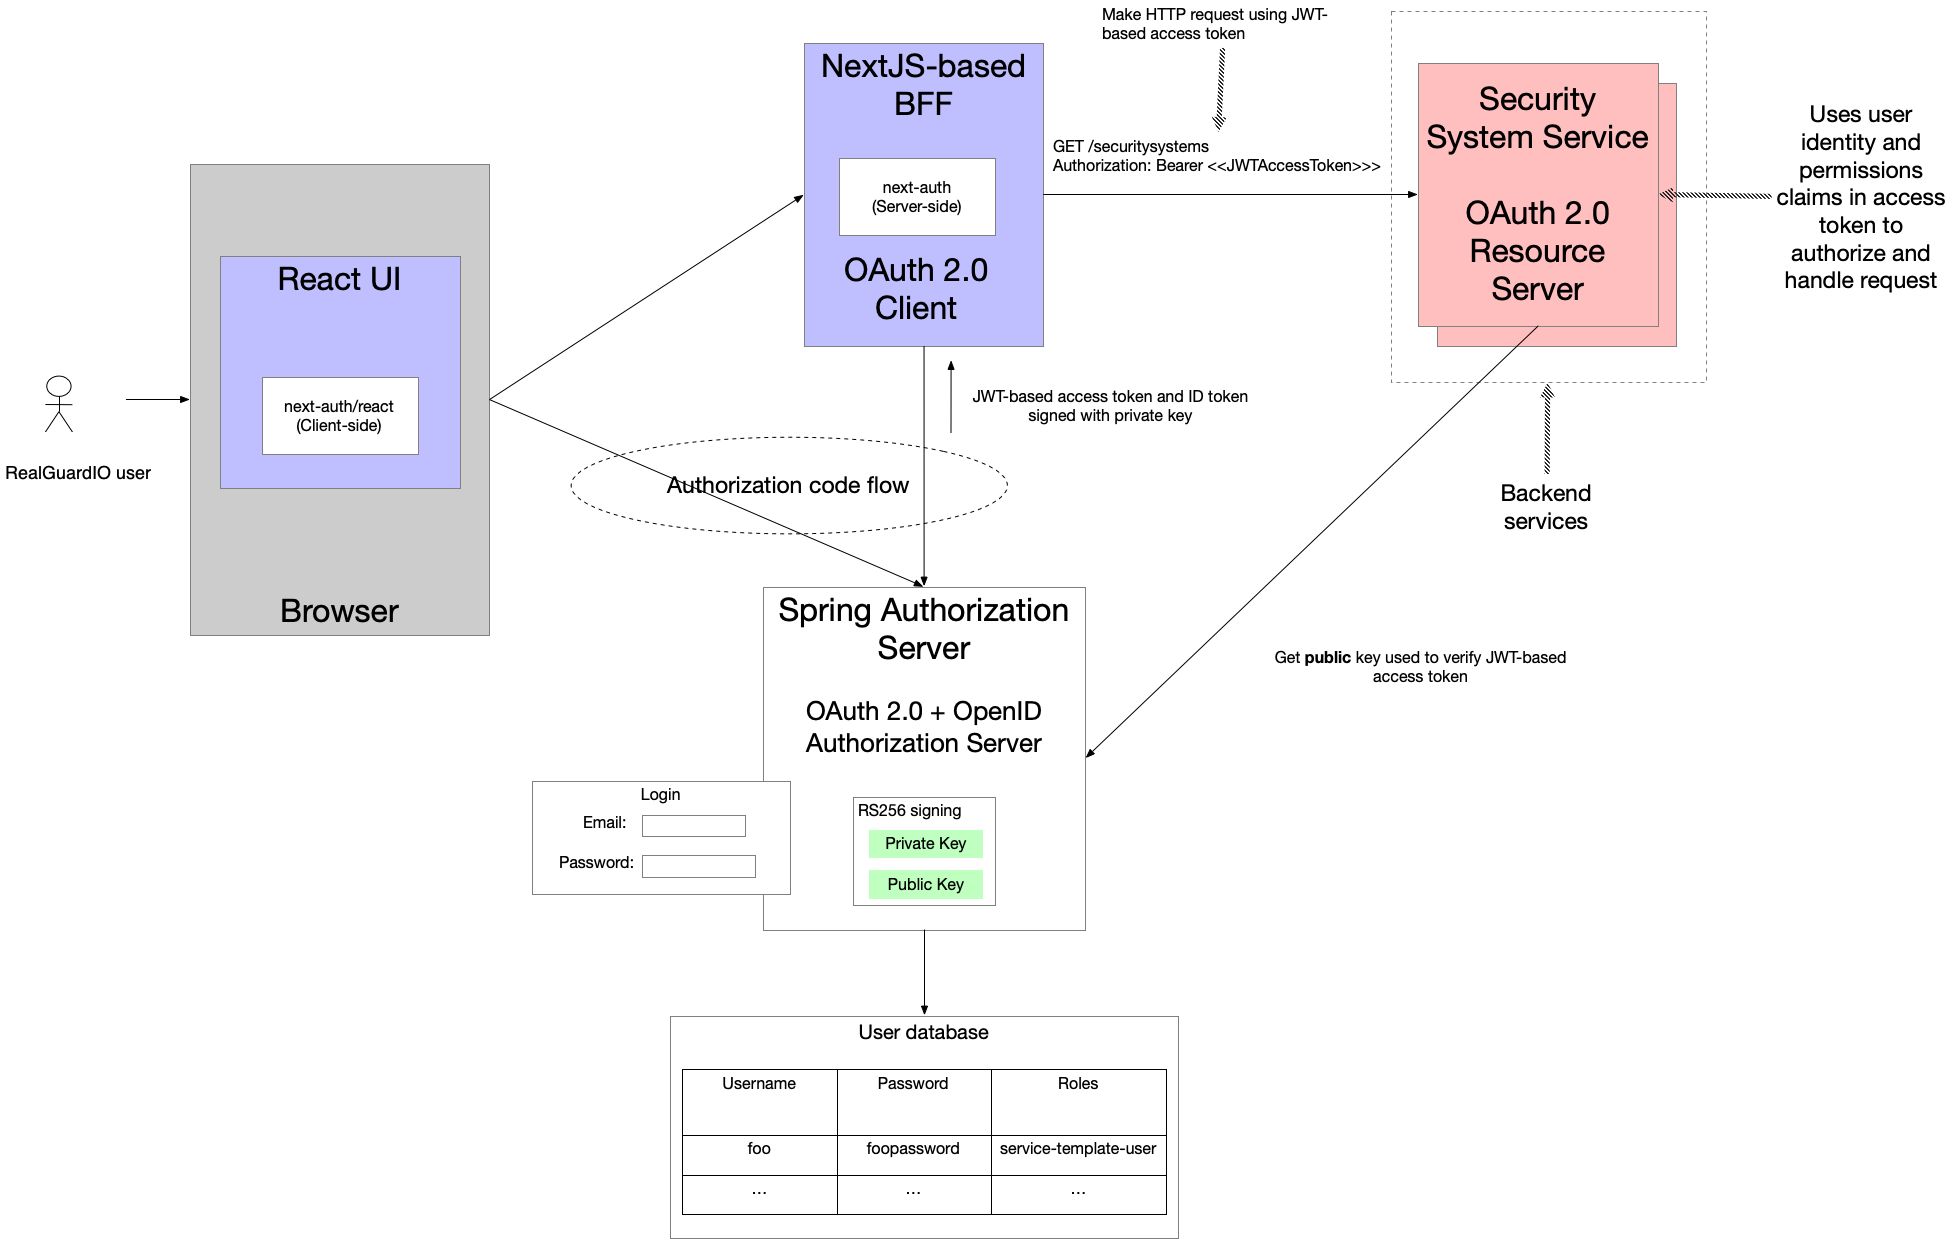
The key elements of the RealGuardIO architecture are as follows:
-
React-based UI - runs in the browser and implements the RealGuardIO UI.
-
BFF - the NextJS/Typescript-based Backend for front-end, which plays the role of an OAuth 2.0 client. It manages the user’s session, forwards requests from the React UI to the backend services and implements security using the
next-authlibrary. -
Spring Authorization Server-based IAM service - handles authentication including the login page and issues access tokens and ID tokens to BFF.
-
Backend services - implement the application’s business logic and play the role of resource servers. They use the access token’s user identity information and permissions to authorize and handle the requests.
Login is implemented using the OAuth 2.0 authentication code flow, which I’ll describe in more detail below.
When a user logs in successfully, the IAM service issues an access token and ID token to BFF, which stores them in the user’s session.
When the React UI makes an HTTP request to BFF, such as GET /api/securitysystems, the request includes the session cookie.
The BFF’s handler for the endpoint extracts the access token from the session and includes it in the request sent to the backend service.
Let’s look at each of the architectural elements in more detail.
React-based UI
The RealGuardIO React-based UI runs in the browser.
Its home page queries the session, which it retrieves from the BFF, to determine whether the user is logged in.
If the user is not logged in, the home displays a login button, which uses the next-auth/react library to initiate the login flow.
Once the user is logged in, the home page displays the alarm systems that are accessible to the user.
The home page invokes the BFF’s REST API endpoint to retrieve those security systems.
BFF
The BFF, which plays the role of the OAuth 2.0 client, is written in Typescript and uses NextJS, which is both a NodeJS-based server-side framework and a React-based client-side framework. It implements the OAuth 2.0 client and session management functionality using the NextAuth authentication library. This library exposes various endpoints as shown in the following diagram:
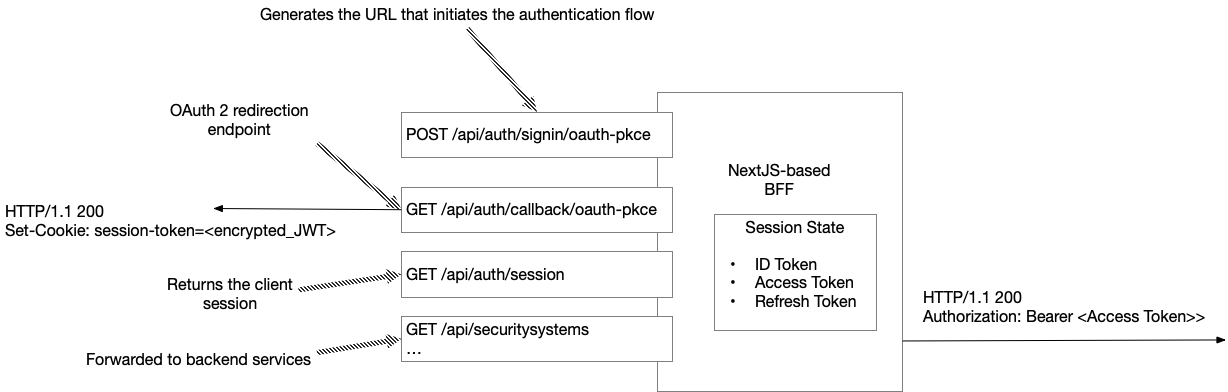
This library implements a REST API, which is used by the NextAuth.js client.
It defines a POST /api/auth/signin/:provide endpoint, which the NextAuth.js client invokes when the login button is clicked.
This endpoint returns the URL for making a request to the Authorization Server’s authorization endpoint, which initiates the authorization flow.
It also implements the OAuth 2.0 redirection endpoint, which is the URI to which the authorization server redirects the user’s browser after authentication is complete. This endpoint’s handler obtains the ID token, access token and refresh token from the authorization server’s endpoint and then redirects the browser to the React UI’s home page.
NextAuth also maintains the session state that contains the ID token, access token and refresh tokens along with the application data.
The session is an encrypted JWT stored in a cookie.
The client can obtain the session state from the GET /api/auth/session endpoint.
For security reasons, this endpoint typically returns a subset of session state, e.g., sensitive data such as the refresh token is private to the BFF.
In addition to implementing endpoints for authorization and session management, the BFF also routes API requests from the React UI to the backend services. For each inbound request, it gets the access token from the session and includes it in the outbound request.
Spring Authorization Server-based IAM service
The Spring Authorization Server-based IAM service plays the role of the OAuth 2.0/OpenID Connect Authorization server. The following diagram shows the key endpoints that implement authentication:
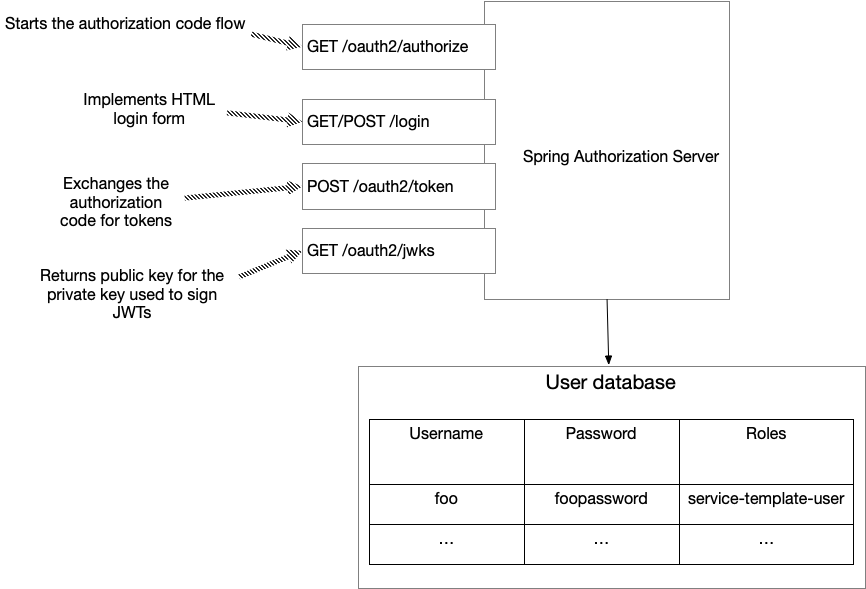
The IAM service implements the login page. It also issues access, ID, and refresh tokens to BFF.
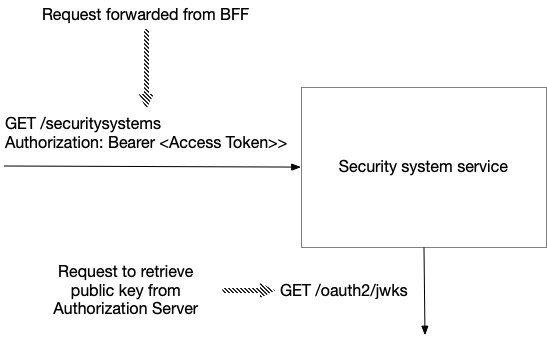
Backend services
Each service, such as the Security System Service, plays the role of an OAuth 2.0 Resource Server.
When a service receives a request from the BFF, it first validates the token.
It verifies that the JWT has not yet expired and that its iss claim matches the base URL of the IAM service.
It also verifies the JWT’s signature using the public key obtained (and cached) from the IAM service’s JWKS endpoint
Once a service has verified the JWT, it uses the JWT’s claims to identify and authorize the user.
The login flow
Now that we have looked at the architecture’s elements, let’s look at how they collaborate to authenticate the user.
The flow is initiated when the user clicks the login button.
The login button invokes the signIn() function, which is implemented by NextAuth client library.
The following diagram shows the resulting interactions:
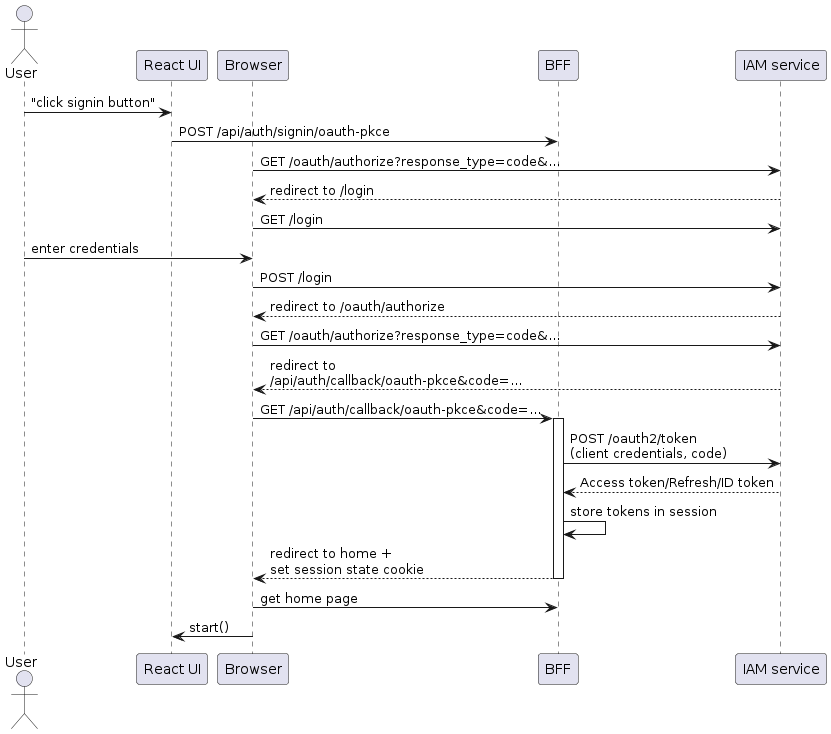
The sequence of events is as follows:
-
React UI fetches the URL to start an authentication code flow request from the BFF and tells the browser to go to that URL
-
Browser opens the IAM service’s authorization endpoint
-
IAM service redirects the browser to the login page
-
User enters their credentials
-
Browser POSTs the user’s credentials to the IAM service
-
IAM service verifies the user’s credentials and redirects the browser to revisit the authorization endpoint
-
IAM service redirects the browser to the URL specified by the
redirect_urisupplied in step 1 with additional query parameters - most notably an authorizationcode, which is a one-time use credential for getting tokens -
BFF makes a request to IAM service’s token endpoint, supplying various parameters including the client credentials and the authorization
code -
IAM service validates the client credentials and the code and returns ID token, access token and refresh token
-
BFF stores the tokens in the session and redirects the browser to home page, setting the session cookie
-
Browser opens the application’s page, which loads the React-based UI
The request flow: from UI to backend services
Let’s now look at what happens when the browser makes a request, such as GET /api/securitysystems, via the BFF to a backend service.
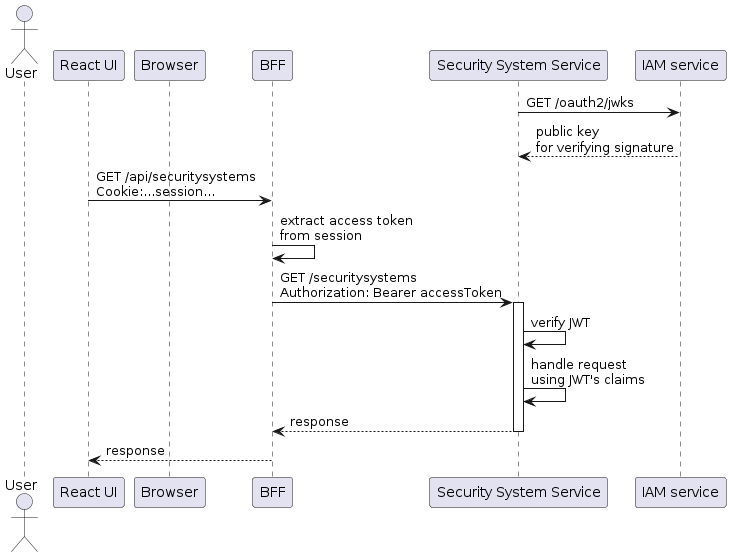
The sequence of events is as follows:
-
On startup, the
Security System Servicefetches the public key for JWT signature verification from the IAM service -
Later, the React UI makes an HTTP
GET /securitysystemsrequest to the BFF, which includes the session cookie -
BFF extracts the access token from the session and includes it in the request to the
Security System Service -
Security System Servicevalidates the request’s JWT using the public key obtained from the IAM service’s JWKS endpoint. -
The
Security System Servicereads the JWT’s identity and authorization claims and uses them for permission checks. -
Security System Servicereturns a response to the BFF -
BFF returns the response to the React UI
Show me the code
The RealGuardIO application (work-in-progress) can be found in the following GitHub repository - coming soon.
Acknowledgements
Thanks to Indu Alagarsamy, Greg Sarjeant, Meghan Gill, Michael Brodskiy and YongWook Kim for reviewing this article and providing valuable feedback.
Summary
-
In a microservice architecture, an API gateway acts as a gatekeeper for client requests. It’s an ideal, central location to implement authentication.
-
While an application could implement authentication itself, given its importance and complexity, it’s usually better to delegate authentication to an identity and access management (IAM) service.
-
The IAM service can either be a self-hosted solution, such as Spring Authorization Server or Keycloak, or a cloud-based solution, such as Okta or AWS Cognito.
-
An IAM service typically implements authentication using the OAuth 2.0 and OpenID Connect protocols.
-
The IAM service handles login and issues ID tokens, access tokens, and refresh tokens to the application’s BFF.
-
The ID token and access tokens are typically JWTs, which contain claims about the user and their permissions.
-
The refresh token is an opaque token that is used by the BFF to obtain new access tokens, which are typically short-lived to limit the impact of token theft.
-
The BFF stores the tokens in the user’s session and includes the access token in requests to the backend services.
-
A backend service validates the access token and uses its claims to identify and authorize the user.
What’s next
The next article describes how to implement JWT-based authorization. Later articles describe how to implement more complex authorization mechanisms, including how to use the Oso Cloud authorization service.
Need help with modernizing your architecture?
I help organizations modernize safely and avoid creating a modern legacy system — a new architecture with the same old problems. If you’re planning or struggling with a modernization effort, I can help.
Learn more about my modernization and architecture advisory work →